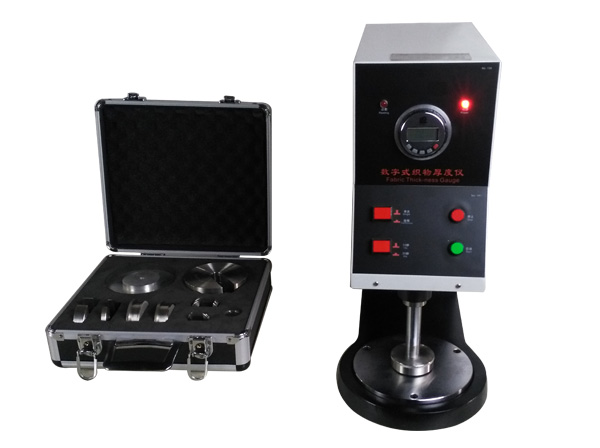
As a sophisticated instrument, please read the instruction carefully before it is switched on.
Before using the instrument, please read the instruction carefully and keep it well. Should you have any doubt or problems after reading, do not hesitate to contact the company.
Maintenance of the Instrument
The instrument has simple structure and convenient maintenance. When using the instrument, take care to prevent invasion of dust, oil dirt, water or other liquid into the instrument and always keep the instrument clean, replace indication lamp immediately if it is broken.
The driving part of the instrument adopts dust-proof roller bearings. In order to ensure its flexible it is lubricated by the watch oil. You can fill a few of eth watch oil if necessary. If action is something stagnant, dismount it and clean, then mount and adjust it to ensure its precision of measurement.
Important Hint
Though the instrument passed strict adjustment and inspection and is packed perfectly before it is leaving the factory, it shall still have unforeseen damage due to severe vibration in the course of transportation, therefore it is necessary to make check and adjustment before using it so as to ensure normal application of the instrument.
The power supply of the instrument should have good grounding so as to ensure safety of operator and the instrument.
When the instrument is not in use or the presser is replaced, please place the sponge cushion between the presser and the reference plate so as to protect the working surface free of damage.
Avoid oil dirt, water or other liquids entering into the digital display otherwise the instrument could be damaged.
Avoid applying the instrument under the environment with high temperature and high humidity. The working temperature should be 0°C to 40°C and the relative humidity should be≤80% otherwise the accuracy of the instrument could be affected.
When the digital display is not in use for a long time, the battery should be taken out.
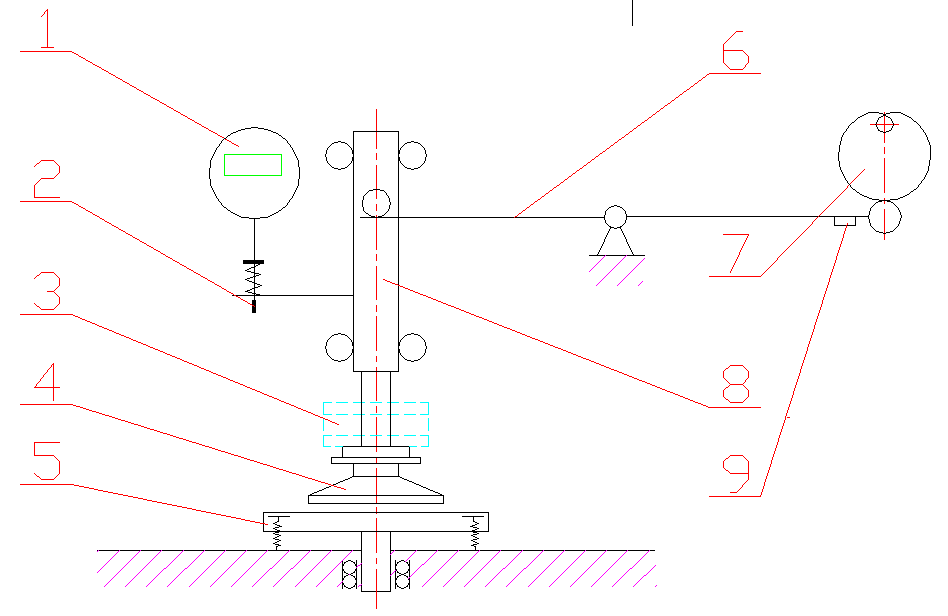
Description:
1. Digital Display 2. Rough Adjustment Screw for Zero
3. Pressing Weight 4. Presser
5. Adjustment Position of Reference Plate 6. Lever
7. Cam 8. Guide Device
9. Weight
I. Purpose
The instrument is in accordance with the stipulations of GB/T3820-1997 <Measurement of Thickness of Textile and Textile Products>. It can be used to measure thickness of various kinds of woven fabric, knitting, non-woven fabric and geotextile as well as that of other materials with even thickness.
II. Technical Index
· Range of Thickness to be Measured: 0.01 – 25 (mm)
· Resolution: 0.001 (mm); Accuracy: 0.01 (mm)
· Area of Presser: 100,2000,2500,10000 (mm
2)
· Diameter of Presser: 11.28,50.46,56.42,112.84 (mm
2)
· Pressing Time: 10,30 (second)
· Lowering Speed of Presser: 1.89 (ms)
· Speed of Presser: after 10 seconds of pressing, about 2.1 (times/min.);
after 30 seconds of pressing, about 1.2 (times/min.);
· Weight of Instrument: about 25 (kg)
· Outline Sizes: 450 (mm)×216 (mm)×305 (mm)
III. Structure of the Instrument (see sketch of the instrument)
· The instrument adopts electric lifting/lowering, lever weighing balance, direct pressing, automatic timing and digital display mode, it can be used under normal environmental condition in laboratory.
· It can automatically measure thickness of fabric in continuing or single time mode, the pressing time has two grades, i.e. 10 seconds or 30 seconds so as to avoid manmade error due to manual measurement.
· The instrument has five weights in which two are 50 cN, two are 100 cN and one is 200 cN a well as four pressers with area of 100 mm
2, 2000 mm
2, 2500 mm
2 and 10000 mm
2, thus to form different pressures stipulated in GB/T3820-1997 for your choice.
· The guide device for presser up/down and other driving sets all adopt roller bearings. The presser can be connected with measurement rod axle with position reference by swinging screw which can ensure the parallelism within 0.2% before and after the presser is replaced. The distance between the center of the presser and side surface of the vertical column is larger, which can meet the requirement to measure thickness on large fabric without cutting other sample.
· The core axle of the reference plate has double-row angular spherical bearings mounted thus the parallelism between the top surface of the reference plate and the bottom surface of the presser can be easily adjusted by three screws.
· The digital display instrument has functions such as LCD, zero-setting at any position and conversion between metric and British systems.
IV. Unpacking Inspection of the Instrument
In order to prevent damage due to vibration in the course of transportation when the instrument is leaving the factory, the lever device is tied by ropes which should be untied after unpacking.
Though the instrument passed strict adjustment and inspection and is packed perfectly before it is leaving the factory, it shall still have unforeseen damage due to severe vibration in the course of transportation, therefore it is necessary to make check of following items:
· Check all screws to see if loosening occurs.
· Check if battery is enough charged, if all buttons are flexible and effective, if display value is clear and stable, if strokes are missing or broken.
· If the measurement lever axle moves up/down normally, no blockage or over loosening should occur.
· If electric wiring is disconnected or loosened, if all switches can work normally (no power supply is switched on at this time).
· If the balance position of measurement lever axle is normal. The way is as follows: when no heavy weight is applied, place a 10 cN weight on the presser. If the presser can then lower down to the working surface of the reference plate, it means it is qualified. Normally the balance position of this part is adjusted well by the factory and customer is not needed to make readjustment.
In case no heavy weight is applied or a 10 cN weight is placed on but the presser still cannot contact closely with the working surface of the reference plate, it means it is disqualified. At this time loose the screw on the support of the lever to move the whole lever device backward a bit. In case no heavy weight is applied or a 10 cN weight is placed on but the presser has contacted closely with the working surface of the reference plate, it is also disqualified. At this time loose the screw on the support of the lever to move the whole lever device forward a bit. When the balance is reached, tighten the screw of the support.
· Check if the working surface of the presser is paralleled with that of the reference plate. The way is as follows: apply the pressing weight to make the presser freely drop down to contact with the working surface of the reference plate, check the clearance of front, rear, left and right four points between two working surfaces by the feeler of 0.02 mm. It is referred to be qualified if the feeler of 0.02 mm cannot be inserted. Take care that there should be no any objects between two working surfaces when making check. All parts of the measurement rod axle should have no any loosening. If the requirement cannot be reached, adjust the reference plate by socket spanner accompanied with the instrument.
· Switch on power supply and press down the start button to see if all actions are normal.
If all check items mentioned above are qualified, the instrument can then be put into normal operation.
V. Application of the Instrument
The levelness of the table surface in normal laboratory can all meet the requirement of the application of the instrument. Only the working table is placed levelly the instrument can be put into application.
The preparation of the sample should follow the stipulations in GB/T3820-1997. As the reference plate of the instrument has enough space roundabout it is not needed to cut sample for normal measurement of thickness.
The instrument can be operated by one operator, who shall record measurement data each time and prepare the test report.
The application procedure of the instrument:
· Based on type of fabric to be measured, reasonably select the presser, pressing time and pressing weight. For the sample with uneven pattern on the surface, the diameter of the presser should be no less than the circulated length of the pattern. If necessary, select smaller pressers to make measurement and report the thickness of concave part or convex part separately.
· Clean reference plate, presser and measurement rod axle etc. of the instrument, and no dust or fiber should be found. Check the measurement rod to see if it can move up/down freely.
· Based on the requirement of measurement, push the selector switch of “continuing” or “single time” and “10 seconds” or “30 seconds” to the required positions, apply selected weights to make the presser contact with the working surface of the reference plate.
· When adjusting the zero position of the digital display, first of all press ON/OFF button of the digital display to open it, then set zero as per the manual of the digital display (see VI). Make unload test several times and make formal test on fabrics after zero position is stable.
When make unload test of zero position, the drift of zero position should be no larger then ±0.005 mm. Each time when finishing the measurement to check zero return, it is not limited by it especially for some fabrics whose fiber is easily dropped and stuck on working surfaces of the presser or the reference plate, so the error of zero returning may exist however the instrument has no actual drift of zero position. If check zero return after cleaning it is meaningless because the status is changed. Therefore the check of zero return after measurement should be analyzed based on actual condition. If minor error occurs but measurement data are still stable it can be referred to effective; if error of zero return is too large or measurement data are unstable, it should make cleaning again and make measurement again after zero position is readjusted.
· Switch on power supply and the switch the indication lamp of power supply lights. Press down the start button the instrument works.
· When the presser is lifted up, put the fabric to be measured on the reference plate without tension and deformation.
· When the specified time is up after the presser is placed on the fabric the indication lamp of reading lights automatically. Read the indication value of thickness on the digital display as quickly as can and make record when the lamp lights. Reading is ineffective if it is read when the lamp goes out.
· If “continuing” test is adopted, the presser is lifted up automatically when the lamp goes out, and is lifted up/lowered down automatically. If “ingle time” test is adopted, the presser has no repeated action.
· Move the fabric to be measured to the new part to be measured within the interval between lifting and lowering of the presser. Repeat procedures mentioned above until all specified parts are measured or every sample is measured.
· After completion of measurement, take out the measured fabric and press down the stop button immediately when reading indication lamp goes out (in 10 seconds after the lamp goes out) if “continuing” test is adopted, then switch off power supply.
· Fill out measured data in the prepared test report.
· Take out pressing weight and put it into the box, switch off power supply of the digital display, draw off the plug of power supply and clean all parts, cover the instrument by cloth.
When the instrument is not in use or the presser is replaced, please place the sponge cushion between the presser and the reference plate so as to protect the working surface free of damage.